The post Track & Wall Anchors appeared first on Gallery Systems.
]]> NOTE: When installing the slimline track onto plasterboard walls, it is recommended it is secured to the wall by screwing into as many wall studs as possible. If it is not possible to line up with all available wall studs you can use plasterboard fittings (wallmates).
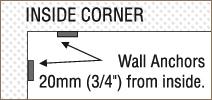
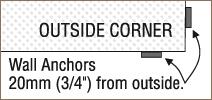 The wall anchors are used to fix the track to the wall. They butt up against the ceiling or cornice and should be spaced 20mm from each end and 400mm to 500mm apart. This allows for at least five wall anchors for every 2m length of Slimline track. Using any less than the recommended wall anchors is at your own risk.
When continuing track around a corner fix the wall anchors as shown.
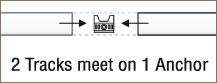 When running two or more lengths of track continuously along a wall we suggest you use just one wall anchor to support both track ends where they join. This will ensure the two ends are perfectly aligned.
Fixing to your wall
Plasterboard Walls: Hold the wall anchor butted up against the ceiling with its wings pointing upward. Fit an 8 gauge screw into the hole in the wall anchor and tap with a hammer to mark the screw position. Then drill on the mark using a 3mm drill (1/8″).
If you strike a timber stud fix the wall anchor in place with a 25 x 8 gauge screw.
If there is no stud, drill the hole out to 6mm (1/4″) and fit a “Wallmate” fitting. Then fix the wall anchor using a 25 x 8 gauge screw.
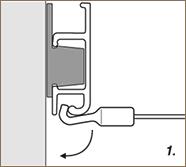
Once all the wall anchors are fixed to the wall, hold the track in place and snap onto the wall anchors.
Masonry Walls: Hold the wall anchor firmly against the wall, butted up against the ceiling and using the anchor as a guide drill into the wall with a 4mm (5/32″) masonry drill to a depth of 20mm (1″) or so. Now redrill to a depth of 40mm (2″) using a 6mm (1/4″) masonry drill. Tap a 6mm (1/4″) wall plug into the hole so the top is flush with the surface and fix the wall anchor in place with a 25 x 8 gauge screw. When the wall anchors are in position hold the track in place and snap the track onto the wall anchors.
The post Track & Wall Anchors appeared first on Gallery Systems.
]]>The post Hangers appeared first on Gallery Systems.
]]>
As long as you do not exceed the maximum weight recommendations below you can hang two or more pictures on each hanger.
How strong is it?
Slimline Clear Tape Hangers
Recommended weight on one Slimline Clear Tape Hanger is 7kg (15lbs).
Slimline Stainless Steel Cable Hangers
Recommended weight on one Slimline Stainless Steel Cable Hanger is 15kg (33lbs).
The post Hangers appeared first on Gallery Systems.
]]>The post Mini Hooks appeared first on Gallery Systems.
]]>
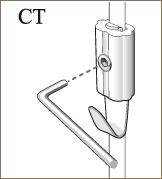
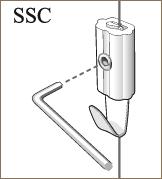
Directions:
Loosen the screw using the Allen key provided. Feed the end of the clear tape (or Stainless cable) through the hook body. Slide to the required position and tighten with the Allen Key.
Recommended Weights:
Clear Tape 7kg (15 lbs) per hook. Stainless Cable 15kg (33lbs) per hook.
The post Mini Hooks appeared first on Gallery Systems.
]]>The post Push-Button Hooks appeared first on Gallery Systems.
]]>
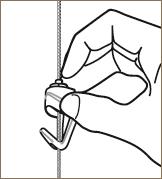 Directions:
Fit the stainless steel cable into the top of the hook. To move the hook along the cable press the button on the top of the hook as shown. While the button is down the hook will move freely. The hook grips the cable when the button is released.
Recommended Weight:
14kg (30lbs) on one hook.
The post Push-Button Hooks appeared first on Gallery Systems.
]]>The post End Caps appeared first on Gallery Systems.
]]>
To Cap the end of a single length of track
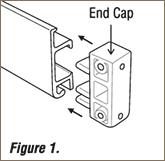
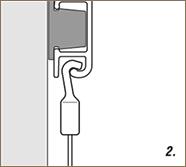
Push the End Cap into the end of the track as shown in Figure 1.
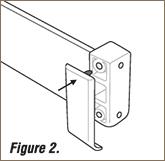
Snap the twin covers in two and fit the single cover into the End Cap as shown in Figure 2.
The curved part of the cover must face downwards.
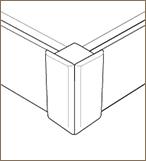
To fit the End Cap to an outisde corner
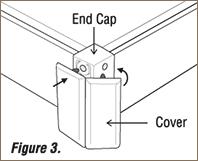
Push the End Cap into the end of the track as shown in figure 1.
Then fit the hinged cover as shown in Figure 3.
Inside Corners don’t expose the track ends so no cover is needed.
The post End Caps appeared first on Gallery Systems.
]]>